Howdy, Stranger!
It looks like you're new here. If you want to get involved, click one of these buttons!
Quick Links
Clarification of CellView and how to take nice pictures

Hello,
I'm currently working on a script to automate taking pictures of certain regions of a layout. To achieve this without having to depend on the GUI I'm creating a new LayoutView object which shows the layout I intend to take pictures of.
This layout consists of multiple top cells, each with different layers. You can basically think of it as a layout obtained by this method and additionally some of the cells have their shapes in some of their layers are cleared.
However, I'm running into problems when trying to capture images - namely, only the "first cell" is showing. I'm assuming this stems from my inability to use the LayoutView correctly. I would like it to behave like I would click "Show as Top" on a cell in the GUI.
As a minimal example - consider this layout:
import pya
layout: pya.Layout = pya.Layout()
layout.dbu = 1

# 3 layers
layout.layer(0,0)
layout.layer(1,1)
layout.layer(2,2)

cell_index = layout.add_cell(f"box_1")
box = pya.Box(0, 0, 1, 1)
layout.cell(cell_index).shapes(0).insert(box)
box = pya.Box(0, 0, 2, 2)
layout.cell(cell_index).shapes(1).insert(box)

cell_index = layout.add_cell(f"box_2")
box = pya.Box(1, 1, 2, 2)
layout.cell(cell_index).shapes(2).insert(box)
Taking a picture of the complete layout is achieved by combing the top cells first and then saving the resulting image.
import pathlib
import pya

def combine_top_cells(layout: pya.Layout, top_cell_name: str = "TOP") -> pya.Cell:
    """
    combines all current top cells into a single new one (inplace)
    :param layout: layout with top cells that should be combined
    :param top_cell_name: name of new top cell
    :return:
    """

    old_top_cells = layout.top_cells()
    top_cell = layout.create_cell(top_cell_name)

    for cell in old_top_cells:
        top_cell.insert(pya.CellInstArray(cell.cell_index(), pya.Trans()))

    return top_cell

clipped_layout = layout.dup()
combine_top_cells(clipped_layout)

view = pya.LayoutView()
view.show_layout(clipped_layout, False)  # what does this parameter do? "add_cellview"? I can't see a difference when using it in the GUI.
view.max_hier()  # DO NOT REMOVE, this is needed such that the pictures actually show all the cells

image_directory = pathlib.Path("images").resolve()
image_directory.mkdir(parents=True, exist_ok=True)

view.zoom_box(pya.Box(0,0,5,5))
image_path = image_directory / "all.png"
print(f"saving {image_path}")
view.save_image(str(image_path), 500, 500)
Now regarding the problems - I'm instantiating a new LayoutView similar to when trying to take a picture of the whole layout and trying to update the cell of the active_cellview() instead of having a single top cell, however this does not work.
import pathlib
import pya
from typing import List
clipped_layout: pya.Layout = layout.dup()
clipped_cells: List[pya.Cell] = clipped_layout.top_cells()

view = pya.LayoutView()
view.show_layout(clipped_layout, True)  # what does this parameter do? "add_cellview"? I can't see a difference when using it in the GUI.
view.max_hier()  # DO NOT REMOVE, this is needed such that the pictures actually show all the cells

image_directory = pathlib.Path("images").resolve()
image_directory.mkdir(parents=True, exist_ok=True)

for cell in clipped_cells:
    # show only relevant parts
    view.active_cellview().cell = cell
    view.zoom_box(pya.Box(0,0,5,5))

    image_path = image_directory / f"{cell.cell_index()}.png"
    print(f"saving {image_path}")
    view.save_image(str(image_path), 500, 500)
I read most of the documentation regading LayoutView and CellView, but can't find a way to achieve my desired goal to have pictures of each cell separately.
I played around with LayoutView.show/hide_cell (btw there exists show_all_cells, maybe having hide_all_cells would make sense) and CellViews cell= and cell_index= properties. However, I was unable to create a new CellView and set it as active in the given LayoutView - maybe I have to do this?
Merging into a top cell is also not viable approach, because then shapes / layers from other cells might leak into the picture of the given cell. Moreover I have a single layer present across all cells (used for tagging) which would need to have very difficult-to-implement treatment such that only the corresponding tag is showing.
My questions now are:
1. What exactly is the boolean parameter in LayoutView.show_layout? And how does this influence the behavior?
2. Given a layout with multiple top cells, each with distinct layers, how can I save an Image of each cell, showing only the given cell and nothing else?
Comments
Hi Peter123,
Regarding to this part, "view = pya.LayoutView()" creates a new layout view in background, not showing on the screen, which all the operation is going to take place, and that's why you'll not see a difference in UI.
show_layout?
By adjusting to use the existed layout view, you'll see the clipped gds appears on you current window.
and if you remove the "show layout" part, you now can see the effect.
the gds clip will not bring up to the view, hence you'll not get the correct image output.
take screen shot of every top cell
To take screen shot of every top, simply loop through each of them, set them as top cell, zoom to box and save to img.
following code is done with gui, you can replace this to headless by avoid using "current_view"
Hi RawrRanger,
thanks for the tips. Your code did not execute. I changed it a little bit so it does and runs headless:
This works and solves my problem regarding showing of different cells in different images.
I also did not see a difference when leaving
show_all_cellsout.However, my actual use case is a little bit more complex and I was unable so far to get it work there as well. I'll post another comment with what the issue is, once I know.
Regarding the
show_layoutcall I still have no idea what the parameteradd_cellviewdoes, because the example works with bothTrueandFalse.Hi Peter123
some difference might reqiures a front end GUI to explan, following examples from left to right shows the difference
of using different view and add_cellview parameters.
1) show layout in headless layout view, the operation is done in background.
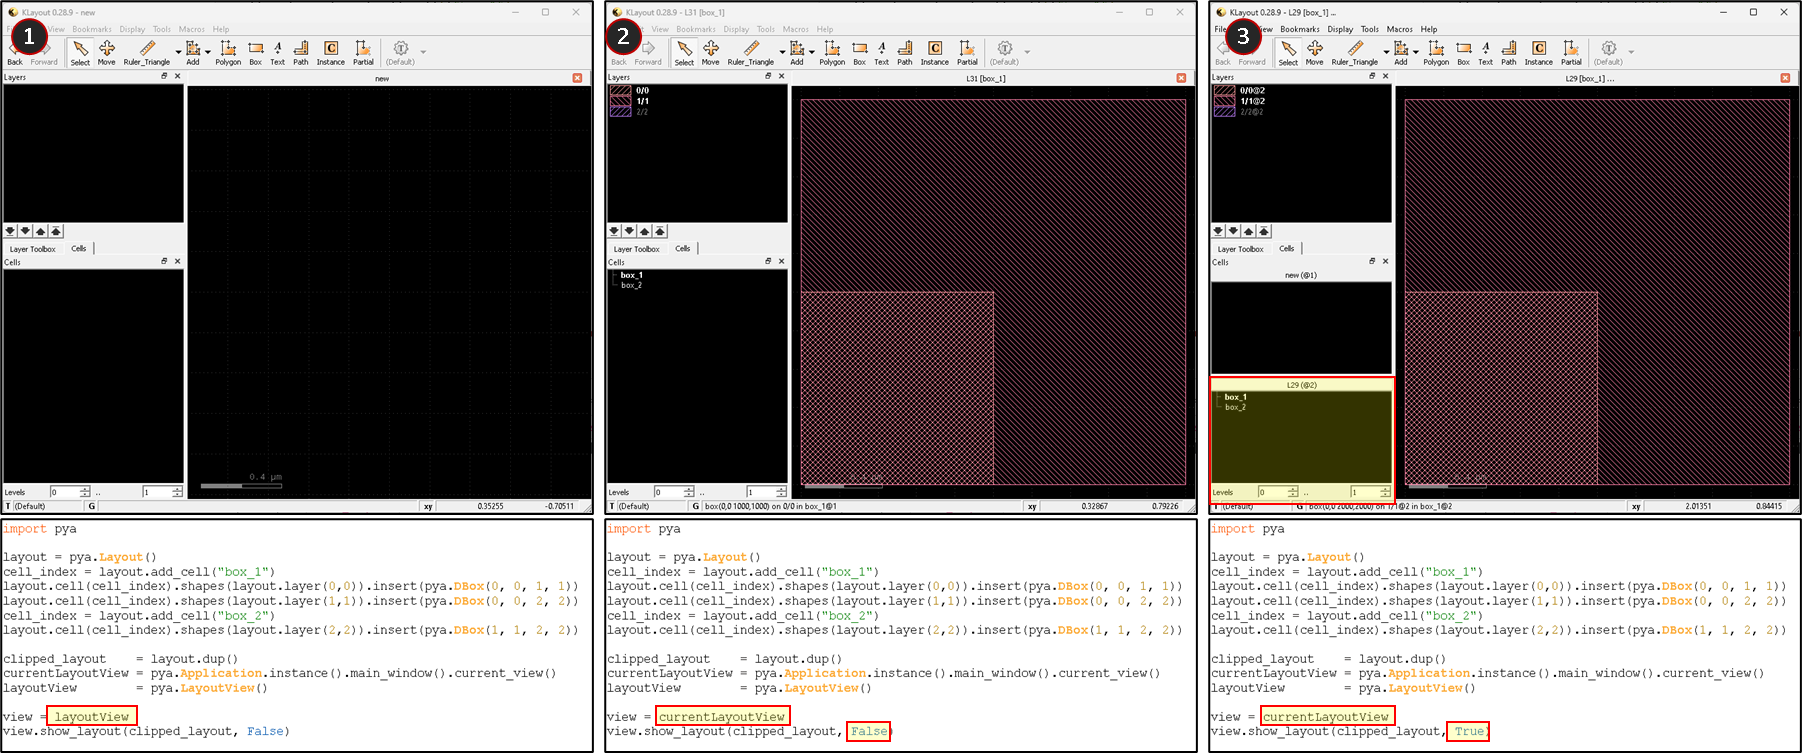
2) show layout in front end GUI, subsituting existing cellview with new cellview
3) show layout in front end GUI, add the layout to a new cellview, a new cell view appears
if you run the script multiple times, you'll see the:
add_cellview = False: the title for cell view will change. (ex: L31 --> L32 --> L33)
add_cellview = True: additional cell view appear, the original L31 will still exist.
Hi, @RawrRanger,")
thanks a lot for the incredibly extensive answers!
So if I understand correctly, the second parameter is only important the GUI and could likely be ignored in headless mode.
However, regading my original question - i'm still unable to take pictures in a truly headless manner. Maybe you have an idea how to fix it or @klayoutadmin / @Matthias does.
The script for testing / generation of images is:
When I'm running this in a KLayout context (e.g. by pressing F5 in the menu) I get two different pictures showing two different cells.
When running this in a pure-python environment the images only show the first cell and don't change.
Hi Peter123,
I tested the code abovein headless modes using two different approachs,
and both case can successfully produce Box1.png & Box2.png (W11x64)
Is there any further info about this case, currently I cannot reproduce the issue.
Here's how I run the tests:
using Klayout_app.exe to run script
1) saved exactly the code above as a screenshot.py file
2) run with CMD command:
.\klayout_app.exe -b -r .\screenshot.pyusing stand-alone py module to run script
1) install stand alone py module using
pip install klayout2) change import from pya to corrosponding modules like below
3) run with CMD command:
python .\screenshot.pyAfter setting up a new python environment and freshly installing KLayout - it works. I assume the problem got patched somewhere along the way, as I was using an older version.
However the second problem, with images showing to many layers still exists. I will try to reproduce this.
Thanks a lot @RawrRanger
Hi Peter123,
To show specific layer(s) only, you'll need to adjust the visibility before taking the screen shots,
can tried to modify the code like this: