HELP: HoneyComb with Circle Pcell

edited January 2019 in Ruby Scripting

Hi,

I'm trying to learn to create a Honeycomb PCell based on the circle example we have in Ruby (I didn't find the same example in Python).

The Circle function in Klayout in Basic works differently than the one in the example.

If I choose Instance -> Basic Lib -> Circle, than to create an Hexagon I change the Number of points to "6".
The distance between the 2 edge of the Hexagon equals to the 2*Radius defined in the PCell.

In the case of the circle example in Ruby, the distance will be by default the 2 * Radius * sqrt(3/4) of the Hexagon.
My target is to write a Pcell where I can define the Width of the Honeycomb and the Thickness of the wall, then adding the number repetition in line and in column as parameters.

I'm thinking to use the difference between two Hexagon (circle of 6 points) of difference radius.

Any suggestion to how to write the code in Ruby or Python will be very appreciated.

Thank you.

Comments

  • edited January 2019

    After verifying the result, I think The basic Circle create a polygon tan to the outside of the circle for 6 points. The ruby code of the circle, create the polygon on the inside of the circle.

    Any help with the code will be welcome.
    Thank you.

  • I was able to create a PCell to do one cell of the Honeycomb. I don't know how I can create an array in rectangular shape without flattening the PCell.

    Any idea?

  • Any help?
  • Hi,

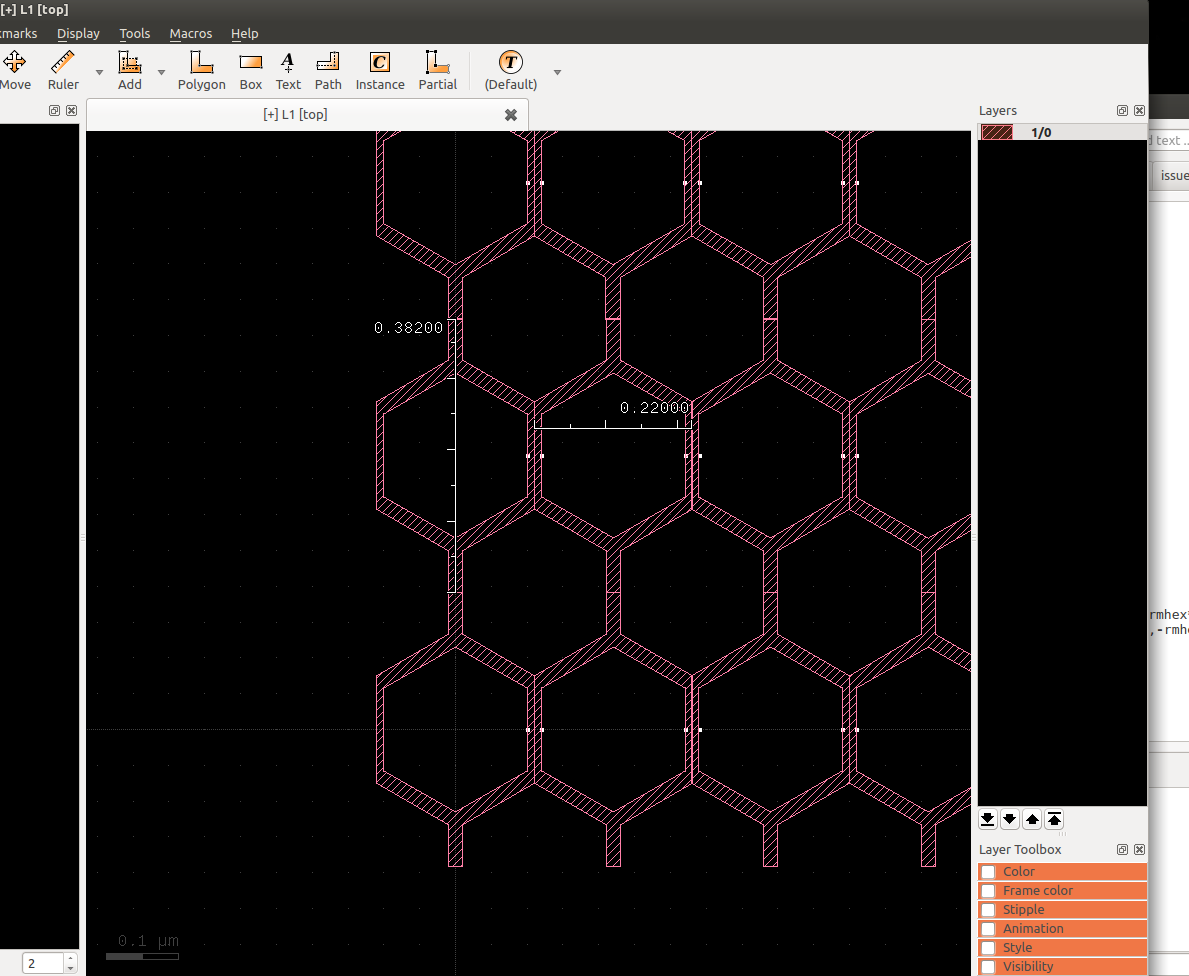
    I think the problem is that the array feature will not allow you to create a rectangular area filled with honeycombs. Will it help, if the basic cell is a rectangular cross section of the honeycomb as in this screenshot?

    Matthias

  • Great idea. I will try to create a Pcell of this shape and use the array feature to create the final shape.

    Sometimes the solution is more easy than what I was expected :)

    Big thank Matthias. Hopefully, I will be able to create a Pcell with the suggestion shape.

  • edited January 2019

    I failed to write the script in Python :(
    But I was able to reproduce the same result if I create the cell manually (less precise) directly in the display windows environment.

    If you wish, I can send you the code I wrote and show me how to fix it.

  • Yes, please do. Ideally you'd attach it here or put it on a gist and link it here. This is a place where everyone can learn and this is a opportunity to do so.

    Matthias

  • The code

    I'm not sure yet how to create the outside polygon correctly.
    I tried also to create a circle where I multiply the radius by sqrt(3/4) to have the internal distance exactly equal to the defined radius.

    The final target is to create honeycombs cell to fit in a rectangular shape.
    The 4 parameters I need to defined are:

    • The internal gap
    • The wall thickness
    • The Width of the rectangle
    • The High of the rectangle

      import pya
      import math
      
      class HoneyCombs(pya.PCellDeclarationHelper):
      
        def __init__(self):
          # Important: initialize the super class
          super(HoneyCombs, self).__init__()
          # declare the parameters
          self.param("l", self.TypeLayer, "Layer", default = pya.LayerInfo(1, 0))
          self.param("hi", self.TypeShape, "", default = pya.DPoint(5, 0))
          self.param("ho", self.TypeShape, "", default = pya.DPoint(10, 0))
          self.param("ri", self.TypeDouble, "Inner radius", default = 0.1)
          self.param("ro", self.TypeDouble, "Outer radius", default = 0.12)
          self.param("wt", self.TypeDouble, "Wall Thickness", default = 20, readonly = True)
          self.param("ri_", self.TypeDouble, "Inner radius", default = 5, hidden = True)
          self.param("ro_", self.TypeDouble, "Outer radius", default = 10, hidden = True)
          self.param("h", self.TypeDouble, "Head length", default = 4, hidden = True)
          self.param("w", self.TypeDouble, "Body width", default = 1, hidden = True)
      
        def display_text_impl(self):
          return "HoneyCombs(Ri=" + str('%.1f' % self.ri) + ", Ro=" + ('%.1f' % self.ro) +")"
      
        def coerce_parameters_impl(self):
          self.wt = self.ro-self.ri
          self.h=self.ro-self.ri
          self.w=self.ri*4*math.sqrt(3/4)
          if self.ri < 0:
            self.ri *= -1
          if self.ro < 0:
            self.ro *= -1
          if self.ri_ != self.ri or self.ro_ != self.ro:
            # update handle
            self.hi = pya.DPoint(self.ri, 0)
            self.ho = pya.DPoint(self.ro, 0)
            # fix params
            self.ri_ = self.ri
            self.ro_ = self.ro
          else:
            # calc params from handle
            self.ri = self.ri_ = math.sqrt(abs(self.hi.x)**2+abs(self.hi.y)**2)
            self.ro = self.ro_ = math.sqrt(abs(self.ho.x)**2+abs(self.ho.y)**2)
      
      
        def can_create_from_shape_impl(self):
          return self.shape.is_box() or self.shape.is_polygon() or self.shape.is_path()
      
        def parameters_from_shape_impl(self):
          self.ro = self.shape.bbox().width() * self.layout.dbu / 2
          self.ri = self.ro/2
          self.l = self.layout.get_info(self.layer)
      
        def transformation_from_shape_impl(self):
          return pya.Trans(self.shape.bbox().center())
      
        def produce_impl(self):
          dbu = self.layout.dbu
          self.ri = self.ri / math.sqrt(3/4)
          self.ro = self.ro / math.sqrt(3/4)
          hexi = []
          anglestep = math.radians(360/6)
          for i in range(6):
            angle = i*anglestep
            x = self.ri*math.cos(angle)
            y = self.ri*math.sin(angle)
            hexi.append(pya.Point.from_dpoint(pya.DPoint(x/dbu, y/dbu)))
          hexo = []
          anglestep = math.radians(360/6)
          for i in range(6):
            angle = i*anglestep
            x = self.ro*math.cos(angle)
            y = self.ro*math.sin(angle)
            hexo.append(pya.Point.from_dpoint(pya.DPoint(x/dbu, y/dbu)))
          comb1 = []
          comb1.append(pya.Point.from_dpoint(pya.DPoint(self.w/2/dbu, -self.h/2/dbu)))
          comb1.append(pya.Point.from_dpoint(pya.DPoint(self.w/2/dbu, self.h/2/dbu)))
          comb1.append(pya.Point.from_dpoint(pya.DPoint(self.ri/dbu, self.h/2/dbu)))
          comb1.append(pya.Point.from_dpoint(pya.DPoint(self.ri/dbu, -self.h/2/dbu)))
          comb2 = []
          comb2.append(pya.Point.from_dpoint(pya.DPoint(-self.ri/dbu, -self.h/2/dbu)))
          comb2.append(pya.Point.from_dpoint(pya.DPoint(-self.ri/dbu, self.h/2/dbu)))
          comb2.append(pya.Point.from_dpoint(pya.DPoint(-self.w/2/dbu, self.h/2/dbu)))
          comb2.append(pya.Point.from_dpoint(pya.DPoint(-self.w/2/dbu, -self.h/2/dbu)))
      
      #      x = self.ro*math.cos(angle)
      #      y = self.ro*math.sin(angle)
      #      star.append(pya.Point.from_dpoint(pya.DPoint(x/dbu, y/dbu)))
          comb1 = pya.Polygon(comb1)
          comb2 = pya.Polygon(comb2)
          hexo = pya.Polygon(staro)
          hexo.insert_hole(hexi)
          self.cell.shapes(self.l_layer).insert(pya.Polygon(hexo))
          self.cell.shapes(self.l_layer).insert(pya.Polygon(comb1))
          self.cell.shapes(self.l_layer).insert(pya.Polygon(comb2))
      
      
      class MyLib(pya.Library):
      
       def __init__(self):
      
          # Set the description
          self.description = "My First Library"
      
          # Create the PCell declarations
          self.layout().register_pcell("Poly_donut", Poly_donut())
          self.layout().register_pcell("HoneyCombs", HoneyCombs())
          # That would be the place to put in more PCells ...
      
          # Register us with the name "MyLib".
          # If a library with that name already existed, it will be replaced then.
          self.register("MyLib")
      
      
      # Instantiate and register the library
      MyLib()
      
  • edited January 2019

    Hi euzada,

    sorry for the late reply - your code isn't bad. Thanks for sharing it. There is a little redundancy with the hidden parameters, but unless you strive for maximum compatibility, that's fine.

    I have changed the generator code to match the screenshot above:

      def produce_impl(self):
        dbu = self.layout.dbu
        mu2dbu = pya.DCplxTrans(dbu).inverted()
        rihex = self.ri / math.sqrt(3/4)
        rohex = self.ro / math.sqrt(3/4)
        rmhex = 0.5*(rihex+rohex)
        hexi = []
        anglestep = math.radians(360/6)
        for i in range(6):
          angle = i*anglestep
          x = rihex*math.sin(angle)
          y = rihex*math.cos(angle)
          hexi.append(mu2dbu*pya.DPoint(x, y))
        hexo = []
        anglestep = math.radians(360/6)
        for i in range(6):
          angle = i*anglestep
          x = rohex*math.sin(angle)
          y = rohex*math.cos(angle)
          hexo.append(mu2dbu*pya.DPoint(x, y))
        rm = 0.5*(self.ri+self.ro)
        clipbox = pya.Box(mu2dbu*pya.DPoint(-rm,-2*rm),mu2dbu*pya.DPoint(rm,2*rm))
        bartop = pya.Box(mu2dbu*pya.DPoint(-0.5*self.wt,rihex),mu2dbu*pya.DPoint(0.5*self.wt,rmhex*3/2))
        barbot = pya.Box(mu2dbu*pya.DPoint(-0.5*self.wt,-rihex),mu2dbu*pya.DPoint(0.5*self.wt,-rmhex*3/2))
    
        # Use a region to produce the result
        res = pya.Region(pya.Polygon(hexo))
        res -= pya.Region(pya.Polygon(hexi))
        res += bartop
        res += barbot
        res &= clipbox
        res.merge()
        self.cell.shapes(self.l_layer).insert(res)
    

    Please note that I use Region objects to compute the final polygon. Regions offer boolean operations which come handy here.

    You see below how the result looks like. I manually created the array to fill the rectangular area.

    The handles are a bit strange as the right one is outside the cell itself. And the array's y pitch is not straightforward: its computed from the ri and ro by: ypitch = 2*(ri+ro)*sqrt(3/4). Because rounding happens to 1nm and there is y symmetry, the height is 382nm.

    By adding two more parameters for x and y step count, the array replication can happen inside the generation code.

    Regards,

    Matthias

  • Here is the screenshot:

  • Thank you very much Matthias.

    I don't know why, DCplxTrans function didn't work in my case. So, I divided all the parameter by the unit of dbu.

    I solve the handle proble by rotation all the shape 90 degree. That way the clipbox will fit perfectly.

    I will share the code, maybe someone will be interested to use it.

    import pya
    import math
    
    class HoneyCombs(pya.PCellDeclarationHelper):
    
      def __init__(self):
        # Important: initialize the super class
        super(HoneyCombs, self).__init__()
        # declare the parameters
        self.param("l", self.TypeLayer, "Layer", default = pya.LayerInfo(1, 0))
        self.param("hi", self.TypeShape, "", default = pya.DPoint(5, 0))
        self.param("ho", self.TypeShape, "", default = pya.DPoint(10, 0))
        self.param("ri", self.TypeDouble, "Inner radius", default = 0.1)
        self.param("ro", self.TypeDouble, "Outer radius", default = 0.12)
        self.param("wt", self.TypeDouble, "Wall Thickness", default = 20, readonly = True)
        self.param("ri_", self.TypeDouble, "Inner radius", default = 5, hidden = True)
        self.param("ro_", self.TypeDouble, "Outer radius", default = 10, hidden = True)
    
    
      def display_text_impl(self):
        return "HoneyCombs(Ri=" + str('%.2f' % self.ri) + ", Ro=" + ('%.2f' % self.ro) +")"
    
      def coerce_parameters_impl(self):
        self.wt = self.ro-self.ri
        if self.ri < 0:
          self.ri *= -1
        if self.ro < 0:
          self.ro *= -1
        if self.ri_ != self.ri or self.ro_ != self.ro:
          # update handle
          self.hi = pya.DPoint(self.ri, 0)
          self.ho = pya.DPoint(self.ro, 0)
          # fix params
          self.ri_ = self.ri
          self.ro_ = self.ro
        else:
          # calc params from handle
          self.ri = self.ri_ = math.sqrt(abs(self.hi.x)**2+abs(self.hi.y)**2)
          self.ro = self.ro_ = math.sqrt(abs(self.ho.x)**2+abs(self.ho.y)**2)
    
    
      def can_create_from_shape_impl(self):
        return self.shape.is_box() or self.shape.is_polygon() or self.shape.is_path()
    
      def parameters_from_shape_impl(self):
        self.ro = self.shape.bbox().width() * self.layout.dbu / 2
        self.ri = self.ro/2
        self.l = self.layout.get_info(self.layer)
    
      def transformation_from_shape_impl(self):
        return pya.Trans(self.shape.bbox().center())
    
      def produce_impl(self):
        dbu = self.layout.dbu
       # mu2dbu = pya.DCplxTrans(dbu).inverted()
        rihex = self.ri / math.sqrt(3/4)
        rohex = self.ro / math.sqrt(3/4)
        rmhex = 0.5*(rihex+rohex)
        hexi = []
        anglestep = math.radians(360/6)
        for i in range(6):
          angle = i*anglestep
          x = rihex*math.cos(angle)
          y = rihex*math.sin(angle)
          hexi.append(pya.DPoint(x/dbu, y/dbu))
        hexo = []
        anglestep = math.radians(360/6)
        for i in range(6):
          angle = i*anglestep
          x = rohex*math.cos(angle)
          y = rohex*math.sin(angle)
          hexo.append(pya.DPoint(x/dbu, y/dbu))
        rm = 0.5*(self.ri+self.ro)
        #clipbox = pya.Box(pya.DPoint(-rm/dbu,-2*rm/dbu),pya.DPoint(rm/dbu,2*rm/dbu))
        #bartop = pya.Box(pya.DPoint(-0.5*self.wt/dbu,rihex/dbu),pya.DPoint(0.5*self.wt/dbu,rmhex/dbu*3/2))
        #barbot = pya.Box(pya.DPoint(-0.5*self.wt/dbu,-rihex/dbu),pya.DPoint(0.5*self.wt/dbu,-rmhex/dbu*3/2))
        clipbox = pya.Box(pya.DPoint(-2*rm/dbu, -rm/dbu),pya.DPoint(2*rm/dbu, rm/dbu))
        bartop = pya.Box(pya.DPoint(rihex/dbu, -0.5*self.wt/dbu),pya.DPoint(rmhex/dbu*3/2, 0.5*self.wt/dbu))
        barbot = pya.Box(pya.DPoint(-rihex/dbu, -0.5*self.wt/dbu),pya.DPoint(-rmhex/dbu*3/2, 0.5*self.wt/dbu))
        # Use a region to produce the result
    
        res = pya.Region(pya.Polygon(hexo))
        res -= pya.Region(pya.Polygon(hexi))
        res += bartop
        res += barbot
        res &= clipbox
        res.merge()
        self.cell.shapes(self.l_layer).insert(res)
    
    
    class MyLib(pya.Library):
    
     def __init__(self):
    
        # Set the description
        self.description = "My First Library"
    
        # Create the PCell declarations
        self.layout().register_pcell("HoneyCombs", HoneyCombs())
        # That would be the place to put in more PCells ...
    
        # Register us with the name "MyLib".
        # If a library with that name already existed, it will be replaced then.
        self.register("MyLib")
    
    
    # Instantiate and register the library
    MyLib() 
    
  • edited March 14

    Hi,
    Thank you very much for your code, it helped me a lot to draw a honeycomb, however i want to make an array of honeycombs in a circle and be able to choose the number of hexagonal and choose the space between each pattern as well as the radius of the hexagonal. I have tried many codes but i failed to do it. If someone has an idea to do that.
    Thank you.

  • edited March 14

  • I think you should first cover the whole area with a honeycomb pattern, then draw a circle on a different layer and use a boolean AND with a third output layer to select the honeycombs inside. The ring can be added using a boolean OR to that layer.

    Matthias

  • Thank you, the problem is that I don’t know how to code honeycomb pattern. I am able to code only one pattern. Do you know how to do that choosing the number of pattern and space between each other ?
    Thank you.
  • The above code generates a single honeycomb cell, but you can place an array of cells (class CellInstArray with two dimension counts and two step vectors). Choosing the right pitch should enable you to create the full array as shown in the screenshot above.

    Matthias

Sign In or Register to comment.