Howdy, Stranger!
It looks like you're new here. If you want to get involved, click one of these buttons!
Quick Links
Klayout save image issue.
Hi sir,
I meet with a Klayout save image issue.
as below , I make some dimention mark and save the image to some of png file .
I can make dimention mark (ruler) and output the file.
But , when I using the ruby code as below , I will get picture only the mark as picture 1.
May I have your help to check what is issue?
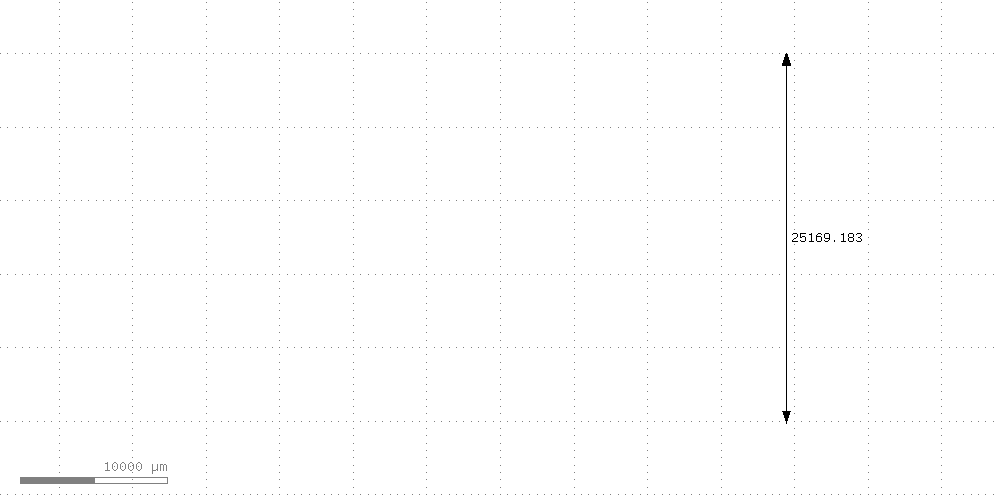
(only a ruler mark, no any pattern)

(it is corrce one , when I output picture by manual)
layoutView = RBA::Application::instance.main_window.current_view.active_cellview.layout
layout_view = RBA::Application.instance.main_window.current_view
cell_view = layout_view.active_cellview
current_cell_name=cell_view.cell_name
app = RBA::Application.instance
mw = RBA::Application::instance.main_window
view = mw.current_view
view.clear_annotations
cell_list_A = Array.new()
fields = Array.new()
each_cell = layoutView.each_cell

each_cell.each do |xxxx|
if xxxx.name.match('[Ff][Ii][Ee][Ll][Dd]') && (xxxx.name.match("PA") || xxxx.name.match("PB")) then
fields << xxxx
end
end

fields.each do |cell_in_field|
cell_in_field.each_inst.each do |yyy|
if yyy.cell.name.match("Dark") then
cell(yyy.cell.name)
output_file1 = "D:\\#{cell_in_field.name}.png"
layout_view = RBA::Application.instance.main_window.current_view
cell_view = layout_view.active_cellview
app = RBA::Application.instance
mw = RBA::Application::instance.main_window
view = mw.current_view
view.clear_annotations

shift=5000
dark=input(93,0)
part_A=dark.xor(dark.extents)
pointx=Array.new
pointy=Array.new
part_A.each do |xx|
points=xx.to_s.gsub("(","").gsub(")","").split(";")
points.each do |yy|
x=yy.split(",")[0].to_f
y=yy.split(",")[1].to_f
pointx << x
pointy << y
  end
end

if yyy.cell.name.match("PA") then
p1x=part_A.bbox.p1.to_s.split(",")[0].to_f
p1y=0
p2x=part_A.bbox.p2.to_s.split(",")[0].to_f
p2y=pointy.uniq.sort[-2].to_f

ant = RBA::Annotation::new
ant.p1 = RBA::DPoint::new(p2x-shift,p1y)
ant.p2 = RBA::DPoint::new(p2x-shift,p2y)
ant.main_position,ant.outline,ant.style =3,0,RBA::Annotation::StyleArrowBoth
view.insert_annotation(ant)
end

if yyy.cell.name.match("PB") then
p1x=part_A.bbox.p1.to_s.split(",")[0].to_f
p1y=pointy.uniq.sort[0].to_f + 10
p2x=part_A.bbox.p2.to_s.split(",")[0].to_f
p2y=pointy.uniq.sort[-1].to_f

ant = RBA::Annotation::new
ant.p1 = RBA::DPoint::new(p1x,p1y)
ant.p2 = RBA::DPoint::new(p2x,p1y)
ant.main_position,ant.outline,ant.style =3,0,RBA::Annotation::StyleArrowBoth
#view.insert_annotation(ant)

ant = RBA::Annotation::new
ant.p1 = RBA::DPoint::new(p2x-shift,p1y)
ant.p2 = RBA::DPoint::new(p2x-shift,p2y)
ant.main_position,ant.outline,ant.style =3,0,RBA::Annotation::StyleArrowBoth
view.insert_annotation(ant)
end

cell = layoutView.cell_by_name(cell_in_field.name)
cv = RBA::CellView::active
cv.cell_name =cell_in_field.name
view.max_hier
rect_drawn1 = RBA::DBox::new(-34000.0, 0, 34000.0, -26700.0)
view.zoom_box(rect_drawn1)
view.save_image("#{output_file1}", 1000,500)
end
end
end
Comments
by the way, how to remove the ration mark (1000um) icon in my picture?
Hi jiunnweiyeh,
I think there are some possible reasons causing shapes are not shown correctly in the screenshot
Desired cell is not set to new top
show cell with "cellName" as the new top before taking screenshot
Cell or layer is hidden
show all layers, cell, and hier
Screenshot without scale bar
For the show/hide screenshot scale bar I didn't find any setting in Doc that provides control to this.
A workaround that provides screenshots without a scale bar
1. Increase the zoom box by 10% of the box height.
2. Get a screenshot with 10% extra pixels in the height direction
3. Use QImage.copy function to get the image with 10% pixels trimmed away from the bottom
4. Save the image
Code example
The function above can be used in this way.
this takes two images from cell "A" and "B" with and without the scale bar respectively.
@RawrRanger Many thanks for your efforts to support this case!
The magic code for disabling the scale bar (ruler) is:
You can basically set every property that is available in the "klayoutrc" file (in
C:\Users\you\KLayoutor~/.klayout). To set the ruler color to red for example, use this:Best regards,
Matthias
Hi Matthias,
I can follow your code to disable the scale bar.
But I still meet with save image issue even I make it view.max_hier
and enable all the layers what I want to shown in picture.
Can you help for that?
Thank.s
Hi jiunnweiyeh,
I don't know whether I read you code correctly or not, but my best guess is you are trying to do a automatic measuring the inner dimension of cell with a border layer (93, 0) and take the screenshot.
Because I don't have the gds that is suitable for debug, so I create a mockup for this test.
Test case and result:

Flow of process
1. filter with cells that is a sub-cell of Field_XXX_PA/PB which it's cell name looks like DARK_YYY_PA/PB.
2. get the bound box of the "hole" of layer (93, 0)
3. add measurement rulers with offset
4. set cell to top, zoom to area, and take screenshot
(1) Filter Cell names
by calling this function it returns a array that contains cell that is placed under "FIELD" cells and it's name looks like DARK_YYY_PA/PB.
(2) Get the boundbox of Hole in layer
after aquire cel name list by filterCells()
we can feed name into this founction and it returns a bound box of the "hole" (partA in your code)
in your case layer and data type should be (93, 0)
(4a) Get screen shot
take screen shot and can apply custom ruler object
rulers only accept "annotation object"
(4b)Custom "Extend"ruler
a ruler that with two end extended and can adjust extension value
(3) A test case DEMO
the test case can be run with attached field_test.GDS file.
the result is shown as the image above, full code and test files is included in zip
Hi jiunnweiyeh,
I run a quick test with your code with my test gds, and I remove line by line and found that if save_image fountion is placed inside "each_inst" loop, then it might not generate image correctly.
Currently I am not quite sure why this is the case, but following two snippet of code provides such comparison.
image captured by following code
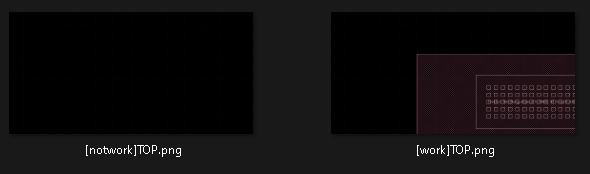
(1) the on the left shows no shape was captured with code labeled with "this not work"
(2) the on the right side did capture shapes successfully, but to me this two piece of code should behaves the same
Hi RawrRanger
Yes , it is what the issue I means.
if save_image code been placed in "each_inst" loop or not,
I will get differnece image result.
I will base on your code to modify some of part for my solution.
Thanks very much for your help.
Dear all,
thanks for this fruitful discussion, specifically to @RawrRanger providing the code example that nicely reproduces the problem.
I debugged the issue and frankly, it's a feature. Namely during iteration of the instances, the layout is put into "updates disabled" mode to prevent changes made inside the loop from spoiling the iterator with potentially catastrophic and hard to detect bugs.
A side effect of that is that save_images will not work as it finds a hierarchy "under construction".
Bottom line: don't use "save_image" while iterating over the instances.
The solution is fairly trivial: instead of doing "save_image" from inside the "each_inst" iteration loop, collect the instances first and then iterate over them.
Instead of:
Use:
In my case this worked.
Kind regards,
Matthias
Hi Matthias
Thanks for your help , I will try to modify my code.