slice a shape into two parts

edited November 2016 in Python scripting
Hi,
I would like to create a macro which would to slice polygons or boxes vertically or horizontally
into two parts. Could you give some hints on how to implement the following?

In detail the functionality of a "slice-vertical" macro would be:
1 - select a set of polygons or boxes
2 - launch the sliceV script through a Shift+V keyboard shortcut
3 - click a point on the layoutview window
4 - an imaginary vertical line going through the point determined in step 3 cuts all the shapes selected in step 1 into two halves.

Similarly for slice-horizontal.


Thanks for help!

P.S. tried if using the erase mode and very narrow paths would work. Nothing happens when
the path width is smaller than dbu. Paths with width > dbu work as expected, but I would really want "infinitesimally narrow" paths, so that the cuts define the shapes nicely along the used grid points.

Comments

  • edited November -1

    Hi,

    the request can probably be implemented, but the effort will be substantial. The basic approach for implementing a feature that provides mouse interaction is to employ the RBA::Plugin framework. A starting point is the documentation provided for the PluginFactory class and a basic introduction to this concept.

    I feel you ask for a emulation of Virtuoso's slice feature. Please consider not keeping the results to yourself but publish them if you think it's useful for others. This is the spirit of open source.

    Kind regards,

    Matthias

  • edited November -1
    Hi Matthias
    and sorry for the delay in my comment :)

    I will probably try implementing this at some point in the future.

    Indeed I'm looking for an emulation feature - I've used Tanner's L-edit and slicing polygons
    has been an integral part of my drawing workflow. I'll share the result as soon as
    I have made something useful.

    Can I use python for using the PluginFactory class (couldn't find any example code on python using this class) or should I learn Ruby?

    Cheers,
    Antti
  • edited January 2017

    Hi Antti,

    one more suggestion: what about a feature like "separate into inner and outer parts"?

    There are already two operations which you can use in order to split a polygon: "Edit/Selection/Intersection" and "Edit/Selection/Subtraction". So imagine you want to keep the right half of a polygon, you could:

    1. draw a rectangle over the right half
    2. copy that rectangle and the original polygon into the clipboard
    3. subtract the rectangle from the original polygon (the rectangle will vanish)
    4. paste the rectangle and the original polygon again
    5. form the intersection with the original polygon

    Admittedly this is very tedious. But how about combining these instructions into a single operation, i.e "Edit/Selection/Separate Inside+Outside"? Then you do

    1. draw a rectangle over the right half
    2. select the original polygon and the rectangle
    3. choose "Edit/Selection/Separate Inside+Outside"

    the result would two polygons - the inside part and the outside part.

    What do you think? This feature is just a combination of existing functions - hence should be straightforward to implement.

    Matthias

  • edited November -1
    Hi Matthias,
    thanks for your response.

    Yes, your suggestion sounds like an easier way to go, definitely something to start with first.

    Eventually, to get mouse interaction I understand that PluginFactory is needed.
    Regarding this, should PluginFactory work with python? If you have any example code of PluginFactory + python I'd appreciate a link...

    Cheers,
    Antti
  • edited November -1
    Hi!

    An alternative way to split the polygon is to use diff mode and draw two identical rectangles over the right half.

    BR,

    Harri
  • edited November -1

    @Harri: thanks for the suggestion and yes, that's one more option.

    I basically wanted to say, that within the framework of the current application it's possible to create a function that probably solves the problem stated. It's just not precisely like L-Edit. Instead of drawing a line you have a draw a mask shape. Within this approach, the solution is a few lines of script:

    # This script requires two selections
    # * the first selection is the "subject" 
    # * the second selection (Shift + click on object) is the "mask"
    # The script will take all polygons from the subject and 
    # separate it into parts inside and outside of the mask. 
    # 
    # TODO: 
    # * as a side effect, the polygons are merged currently
    #   (solution: pass them separately through the boolean operation)
    
    mw = RBA::Application::instance.main_window
    lv = mw.current_view || raise("No layout loaded")
    
    cv_index = nil
    layer = nil
    mask = RBA::Region::new
    subjects = RBA::Region::new
    shapes_to_delete = []
    
    lv.each_object_selected do |obj|
      if obj.shape.is_box? || obj.shape.is_polygon? || obj.shape.is_path?
        poly = obj.shape.polygon.transformed(obj.trans)
        if obj.seq == 0
          subjects += poly
          layer ||= obj.layer
          cv_index ||= obj.cv_index
        else
          mask += poly
        end
        shapes_to_delete << obj.shape
      end
    end
    
    layer || raise("No objects selected")
    mask.is_empty? && raise("No mask objects selection (second selection)")
    
    begin 
    
      lv.transaction("Separate inside/outside of mask")
    
      inside  = subjects & mask
      outside = subjects - mask
    
      lv.cellview(cv_index).cell.shapes(layer).insert(inside + outside)
    
      shapes_to_delete.each do |s|
        s.delete
      end
    
    ensure
      lv.commit
    end
    

    This script can be bound to a menu: if you chose "edit_menu.selection_menu.intersection" it will be put in the "Edit/Selection" menu.

    Regards,

    Matthias

  • I am not familiar with the KLayout scripting API, but I would like to perform something like this, except I would like to split all shapes in half (either vertical or horizontal). This is because during geometry/DRC debug, I often need to measure from the center of a shape (i.e. center of the gate to the metal0 edge). Is it possible for you to modify the previous script answer? Thanks!

  • edited August 2023

    Hi nmz787_intel,

    Here's an example of split selected shapes in half,
    you can paste this into py macro page and enable "run on startup "
    then it'll be bounded to the tool menu.

    Due to the nature of gds, shapes might have remainders after spliting,
    so some split lines might be slightly off by one grid.

    import pya
    
    def sliceSelectedShapes(vSlice = 2, hSlice = 2, deleteShape = False, outLayer = None):
        layoutView   = mainWindow.current_view()  
        cellView     = layoutView.active_cellview()
        unit         = cellView.layout().dbu
        cell         = cellView.cell
    
        layoutView.transaction("SliceShape")
        try:
            for o in layoutView.each_object_selected():
                if not(o.is_cell_inst()):
                    outReg      = pya.Region()
                    target      = o.shape.polygon.transformed(o.trans())
                    targetReg   = pya.Region(target)
                    targetBox   = target.bbox()
                    sliceWidth  = int(targetBox.width() / vSlice)
                    sliceHeight = int(targetBox.height()/ hSlice)
    
                    for i in range(vSlice):
                        for j in range(hSlice): 
                            sliceReg = pya.Region(
                                pya.Box(
                                    pya.Point(targetBox.p1.x + sliceWidth  * i,       targetBox.p1.y + sliceHeight * j), 
                                    pya.Point(targetBox.p1.x + sliceWidth  * (i + 1), targetBox.p1.y + sliceHeight * (j + 1)),
                                )
                            )
                            outReg = outReg + (sliceReg & targetReg)
                    cell.shapes( outlayer if outLayer else o.layer).insert(outReg) 
    
                    if deleteShape:
                        o.shape.delete()  
    
                    remainderV = (targetBox.width()  - (sliceWidth  * vSlice)) * unit
                    remainderH = (targetBox.height() - (sliceHeight * hSlice)) * unit
                    warningV   = "vslice remainder %fum" % remainderV if remainderV > 0 else ""
                    warningH   = "hslice remainder %fum" % remainderH if remainderH > 0 else ""
    
                    if warningV or warningH:
                        warningAnt         = pya.Annotation()
                        warningAnt.outline = pya.Annotation.OutlineDiag
                        warningAnt.style   = pya.Annotation.    StyleCrossBoth
                        warningAnt.fmt     = "\n".join([warningV, warningH])
                        warningPoint       = pya.DPoint(targetBox.center().x * unit, targetBox.center().y * unit)
                        warningAnt.points  = [warningPoint, warningPoint]
                        layoutView.insert_annotation(warningAnt)
    
        finally:
            layoutView.commit()
    
    mainWindow = pya.Application.instance().main_window()
    
    def menu_sliceSelectedShapes():
        if mainWindow.current_view():
            sliceSelectedShapes(vSlice = 2, hSlice = 2, deleteShape = False, outLayer = None)
    
    def bindMenu():
        menu      = pya.Application.instance().main_window().menu()
        act       = pya.Action()
        act.title = "Slice selected Shapes"
        menu.insert_item("tools_menu.end", "Slice selected Shapes", act)
        act.on_triggered(lambda : menu_sliceSelectedShapes())
    
    bindMenu()
    
  • Hi nmz787_intel,

    if your intension is to measure from shape center (boundbox center) without modify the layout
    then you'll need to use Plugin to create custom ruler like example below.

    It kind of work under my limited test cases.
    1. selected ONE shape before click on this center rule measurement
    2. click and the first point of the ruler will be snaped to selected shape BOUNDBOX center
    3. make your measurement

    Note:
    bound box center is not necessary be the shape center if the shape is not rect.
    using ruler (annotation) should able to avoid gds grid limitation, should works better then splitting shapes

    import pya
    
    class CenterRulerPlugin(pya.Plugin):
        def __init__(self, view):
            super(CenterRulerPlugin, self).__init__()
            self.searchMarker = None
            self.edgeMarker   = None
            self.ruler        = None
    
            self.rulerPts     = None
            self.searchBox    = None
            self.edge         = None
            self.start_point  = None
            self.view         = view
            self.searchSize   = 0.5
    
        def activated(self):
            self.set_cursor(pya.Cursor.Cross)
    
        def _clear_marker(self):
            if self.ruler is not None:
                self.searchMarker._destroy()
                self.edgeMarker._destroy()
                self.ruler._destroy()
    
                self.searchMarker = None
                self.edgeMarker   = None
                self.ruler        = None
    
        def _update_marker(self):
            if self.ruler is None:
                self.ruler                    = pya.Annotation()
                self.searchMarker             = pya.Marker(self.view)
                self.edgeMarker               = pya.Marker(self.view)
    
                self.searchMarker.line_style  = 1  
                self.searchMarker.vertex_size = 0  
                self.edgeMarker.line_style    = 0  
                self.edgeMarker.vertex_size   = 4   
                self.ruler.outline            = pya.Annotation.OutlineDiagXY
                self.ruler.style              = pya.Annotation.StyleArrowEnd
                self.view.insert_annotation(self.ruler)
    
            self.ruler.points = self.rulerPts             
            self.searchMarker.set(self.searchBox)
            self.edgeMarker.set(self.edge)
    
    
        def deactivated(self):
            self._clear_marker()
            self.ungrab_mouse()
            self.set_cursor(pya.Cursor.Arrow)
    
    
        def mouse_click_event(self, p, buttons, prio):
            if prio:
                cellView       = self.view.active_cellview()
                unit           = cellView.layout().dbu
                selectedShapes = [o for o in self.view.each_object_selected()]
                if len(selectedShapes) == 1:
                    o      = selectedShapes[0]
                    center = o.shape.polygon.transformed(o.trans()).to_dtype(unit).bbox().center()
    
                    if self.ruler is None:
                        self.rulerPts     = [center, center]
                        self.edge         = pya.DEdge(center, center)
                        self.shapeBox     = pya.DBox(center, center)
                        self.searchBox    = pya.DBox(
                            pya.DPoint(center.x - self.searchSize, center.y-self.searchSize), 
                            pya.DPoint(center.x + self.searchSize, center.y + self.searchSize)
                        )
    
                        self.start_point = center.dup()
                        self._update_marker()
                        self.grab_mouse()
                        pya.MainWindow.instance().message("Drag the box and click again", 10000)
                    else:
                        self._clear_marker()
                        self.ungrab_mouse()
                else:
                    pya.QToolTip().showText( pya.QCursor.pos, "Select one shape BEFORE for center measurement") 
    
                return True
            return False
    
        def mouse_moved_event(self, p, buttons, prio):
            cellView      = self.view.active_cellview()
            unit          = cellView.layout().dbu
            cell          = cellView.cell
            visibleLayers = [layerProp.layer_index() for layerProp in self.view.each_layer() if layerProp.visible]
            minDistance   = self.searchSize
            self.rulerPts = [self.start_point, p]
    
    
            if prio and self.ruler is not None:
                self.set_cursor(pya.Cursor.Cross)
                self.searchBox = pya.DBox(
                    pya.DPoint(p.x - self.searchSize, p.y - self.searchSize), 
                    pya.DPoint(p.x + self.searchSize, p.y + self.searchSize)
                )
                self.edge     = pya.DEdge(p, p)     
    
                for li in visibleLayers:
                    for o in cell.begin_shapes_rec_touching(li, self.searchBox):
                        hoveredShape  = o.shape().polygon.transformed(o.trans()).to_dtype(unit)
    
                        for e in hoveredShape.each_edge():
                            if self.edgeInRange(p, e, self.searchSize):
                                epDistance = e.distance_abs(p)
                                if epDistance <= minDistance:
                                    minDistance   = epDistance
                                    self.edge     = e
                                    self.rulerPts = [self.start_point, self.snapPoint(p, e)]
    
                self._update_marker()
                return True
            return False
    
        def edgeInRange(self, point, edge, detectRange):
            detected   = False
            detectArea = pya.DPath([edge.p1, edge.p2], detectRange).simple_polygon()
            if detectArea.inside(point):
                detected = True
            return detected
    
        def snapPoint(self, point, edge):   
            dx = edge.p2.x - edge.p1.x 
            dy = edge.p2.y - edge.p1.y 
            if dx == 0:
                return pya.DPoint(edge.p1.x, point.y)
            if dy == 0:
                return pya.DPoint(point.x, edge.p1.y)
            else:
                return pya.DPoint(point.x,(point.x - edge.p1.x)/dx * dy + edge.p1.y)
            return None
    
    class CenterRulerPluginFactory(pya.PluginFactory):
        def __init__(self):
            super(CenterRulerPluginFactory, self).__init__()
            self.has_tool_entry = True
            self.register(-1000, "Center Ruler", "Center Ruler")
    
        def create_plugin(self, manager, root, view):
            return CenterRulerPlugin(view)
    
    CenterRulerPluginFactory.instance = CenterRulerPluginFactory()
    
  • I don't believe we have the "zero width path" which some of the
    CAD tools use for "chop". So "Subtract, others from first" will make
    a minW/2 error, maybe off grid.

    But could that (zero width path) be enabled and used for such things?

  • Hello,

    The script below will add a "cross ruler" in the bbox center of each selected object. It can then be used to start your measurement from, or for instance, manually add a label (Text) in a I/O pad center or manually route (Path) from I/O pad center to I/O pad center...

    def add_cross_ruler(layout_view, point)
    
        ruler = RBA::Annotation::new
    
        ruler.p1 = point
    
        ruler.p2 = point
    
        ruler.fmt = ""
    
        ruler.style = 7
    
        layout_view.insert_annotation(ruler)    
    
    end # deff
    
    #------------------------------------------------------------------------------------------------------------------------------------------
    
    module MyMacro
    
      include RBA
    
    #------------------------------------------------------------------------------------------------------------------------------------------
    
      layout_view = Application.instance.main_window.current_view
    
      cell_view = layout_view.active_cellview
    
      layout = cell_view.layout
    
    #------------------------------------------------------------------------------------------------------------------------------------------ 
    
          begin
    
          layout_view.transaction("Add Cross Ruler In Bbox Center Of Selected Objects")
    
          if layout_view == nil
    
            raise "Shape Statistics: No view selected"
    
          end #  if
    
    #-----------------------------------------------------------------------------------------------------------------------------------------
    
    layout_view.each_object_selected do |selected|
    
        if selected.is_cell_inst?
    
            instance = selected.inst
    
            if instance.is_regular_array?
    
                na = instance.na
    
                nb = instance.nb
    
                a = instance.da
    
                b = instance.db
    
                x = instance.dtrans.disp.x + instance.cell.dbbox.center.x
    
                y = instance.dtrans.disp.y + instance.cell.dbbox.center.y
    
                (0..(na-1)).each do |ia|
    
                    (0..(nb-1)).each do |ib|
    
                        center = DPoint.new(x + ia * a.x + ib * b.x, y + ia * a.y + ib * b.y)
    
                        add_cross_ruler(layout_view, center)
    
                    end # each
    
                end # each
    
            else
    
                center = instance.dbbox.center
    
                add_cross_ruler(layout_view, center)
    
            end # if
    
        elsif selected.shape.is_text?
    
            center = selected.shape.text_dpos.to_p
    
            add_cross_ruler(layout_view, center)
    
        else # is shape
    
            center = selected.shape.dpolygon.bbox.center
    
            add_cross_ruler(layout_view, center)
    
        end # if
    
    end # each  
    
    #-----------------------------------------------------------------------------------------------------------------------------------------
    
        ensure
    
          layout_view.commit
    
        end # begin
    
    #-----------------------------------------------------------------------------------------------------------------------------------------      
    
    end # MyMacro
    

    Cheers,

    Tomas

  • edited October 2023

    Sorry for the delay in responding, I have not used scripting in klayout before, at least not successfully... so I was hesitant to try the last ideas provided. Here is my current attempt to use the macro provided by @Tomas2004:

    Create macro

    • Open design, click "Macros" menu from top menu bar
      • click "Macro development"
      • click "[Local]"
      • click "+" near top-left of window
        • click "General KLayout macro (*.lym)"
        • click "OK".
      • In "new_macro" tab, copy-paste code from Tomas2004
        • press CTRL-S to save (or the yellow and black "exit door" looking button, which also might be an arrow on top of a diskette)
      • test by selecting a polygon, then clicking the green "play" arrow button on the macro editor for "new_macro" adds the cross on the center of the selected shape.

    Enable macro access from main menu bar

    • open "Macro development" window and select your macro
      • click wrench icon with orange background, opens "Macro Properties"
        • find "User interface binding", then click "Show in menu"
        • results in a new entry in main menu bar, under Macros menu
          • shows absolute filepath, not sure how to change to better name

    Enable macro access from keyboard hotkey combination

    Assumes macro is accessible from macro menu

    • open "File" menu, then click "Setup"

      • Click "Application", then under it in the listbox, click "Customize Menu"
      • find the entry "macros_menu.macro_in_menu_new_macro"
      • note this "new_macro" was the name auto-generated when we created a new macro text editor window earlier
      • click the row, then in the textbox outside and to the right of the list, type in the characters that represent the keys you want to combine

        • Note, you cannot simply press the key combination, you need to type it out, using + sign as delimiter
        • I entered Ctrl+Shift+R
      • Click "OK" to exit the "Setup" popup

    • Click your shape **of interest, press **Ctrl-Shift-R

    Thanks!

  • @tomas2004 thanks for the code, I just tried it after figuring out how to enable the macro and attach it to a keyboard shortcut. It works to produce a crosshair, but unfortunately my ruler does not snap to the lines of the cross. Is it possible to do that? Also, ideally, the cross lines would extend all the way to the edges of the shape, so you can measure at the ends of the shape, which may be far far away from the center of the bounding-box.

  • @RawrRanger thanks for your first post! That does exactly what I wanted! The only modification I made was to comment out the call to bindMenu, replacing it with the call to the split function directly... this is due to not wanting to mess with figuring out how to run the macro on each KLayout startup, and since I already spent time figuring out how to get a macro hooked up to a keyboard shortcut.
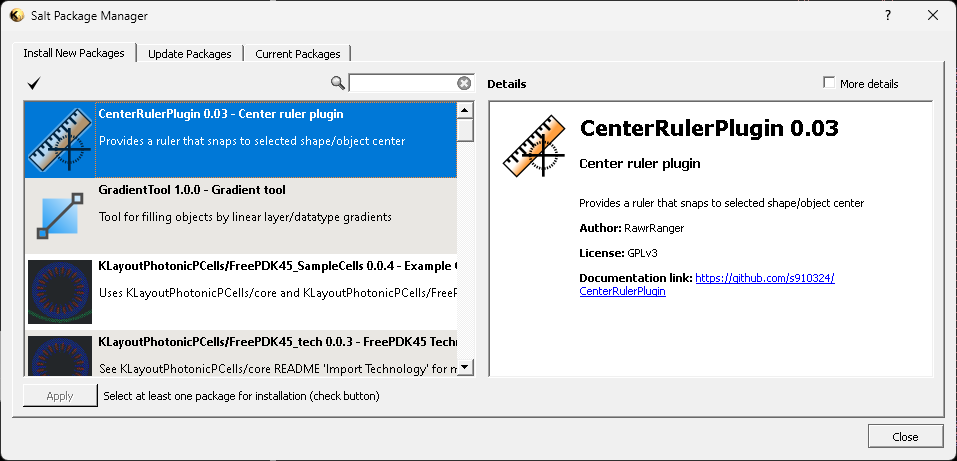
    menu_sliceSelectedShapes()
    #bindMenu()     # this needs called once each time KLayout starts up... which I don't want to figure out, since I already know how to add a macro to the macro menu, and set a keyboard shortcut to one of those (see above post)
    
  • @nmz787_intel

    For split shapes i've create a plugin that can be installed directly from package manager

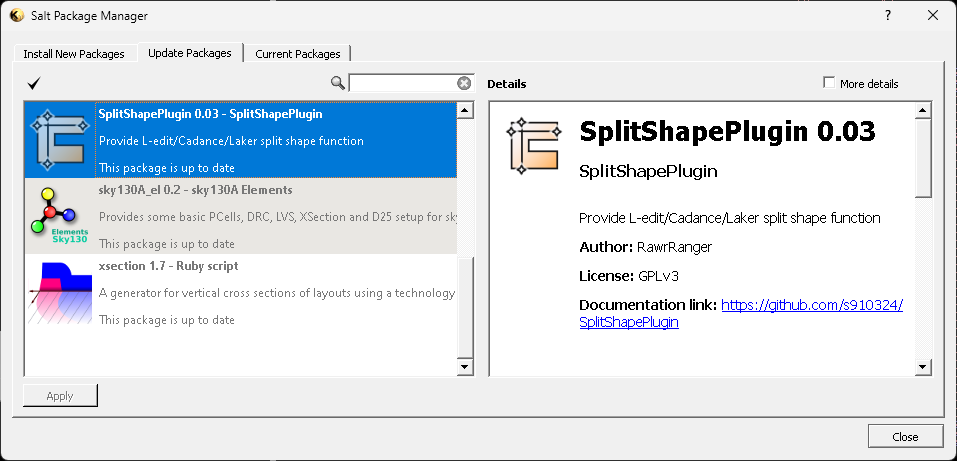
    For measurement from shape center, this plugin allows you to snap ruler to shape center without modify the gds

Sign In or Register to comment.